With Google’s new release of an SSL Certificates having a small ranking boost on search engine ranking, we’ve decided to release an easy tutorial on installing the ssl certificates on an Amazon EC2 Ubuntu server.
For those wanting to check their version of Ubuntu you can run:
lsb_release -aThis is what ours returned:
No LSB modules are available.
Distributor ID:	Ubuntu
Description:	Ubuntu 18.04.5 LTS
Release:	18.04
Codename:	bionic
So let’s dive into what needs to be done to install Standard SSL Certificate with Amazon EC2.
MOVE SSL CERTIFICATES FILES TO SERVER
You need to move your ssl files to server. Follow the following steps.
1. SSH to your server
ssh -i yourkey.pem ubuntu@your_server_ip_or_domain2. Go to your html folder & make a folder to hold the ssl files
cd /var/www/html
sudo mkdir ssl_files
3. Now go to your folder in which ssl files are stored on your local machine & open the terminal CTRL+ALT+T on Ubuntu
4. Move the files to server via Secure Copy Protocal (SCP) to your newly created folder i.e ssl_files. Don’t know how to use SCP? Click here
6. Now SSH again to your server and move the certificate files to required place.
ssh -i yourkey.pem ubuntu@your_server_ip_or_domain
cd /var/www/html/ssl_files

sudo cp your_site.crt /etc/apache2/ssl/your_site.crt
sudo cp your_site.key /etc/apache2/ssl/your_site.key
sudo cp your_site.ca-bundle /etc/apache2/ssl/your_site.ca-bundle
ADDING SSL VIRTUALHOST ENTRIES
At this point, all we need to do is enable the VHOST for our site to render the SSL pages. You will either need to create a new VHOST entry if its a new site, or add this to an existing entry for your site.
<VirtualHost *:443>
    ServerName your_site.com
    ServerAlias www.your_site.com
    DocumentRoot /documentroot/
    SSLEngine on
    SSLCertificateFile /etc/apache2/ssl/your_site.crt
    SSLCertificateKeyFile /etc/apache2/ssl/private/your_site.key
    SSLCertificateChainFile /etc/apache2/ssl/your_site.ca-bundle
</VirtualHost>
Restart the apache:
sudo systemctl restart apache2ENABLE APACHE 2 SSL MODULE IF NOT ENABLED ALREADY
Next thing to do if you haven’t already is to enable the SSL module for Apache and then restarting apache. This is as simple as typing:
sudo a2enmod ssl
sudo systemctl restart apache2
ENABLE SSL TRAFFIC ON AMAZON EC2
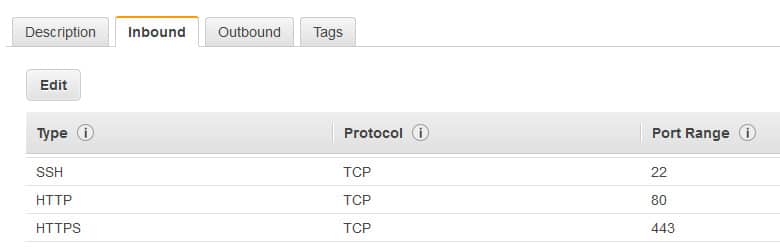
One last step is to ensure SSL traffic is enabled or your security group in Amazon. By default, Amazon does not enable this as not all sites will need it. Log in to your Amazon account, go to EC2 and your server instance. From their click on the Security Group assigned to your site, and enable HTTPs traffic for Inbound.
Load your site and you should now be able to run https! Just make sure to redirect any http url’s to https, so your not serving the same content up twice by mistake, as this would be bad for SEO and hurt your Google rankings. One main reason to add SSL is for Google rankings — we don’t want to gain a little, and lose our seo by serving duplicate content.
That’s it. If you’re still facing the issues? feel free to ask the questions in comment section.